
6YL-160 SCREW OIL PRESS
MODEL 6YL-160 SCREW OIL PRESS
Main Specifications
Shaft speed: 35-39r/m
Gear ratio in gearbox: 15/38x15/52=1:8.78
Motor: 18.5-22KW
Belt: B型
Outer dimension: L×W×H(mm) 2020x700x1480
Weight: 960kg
Capacity:14-17T

2. Oration principle and structure
2.1 oration principle
When oil presses operating prepared material enters extruding chamber from the hopper and then moves forwards by the rotating pressing screw and is pressed. Under the high-pressure condition in the chamber ,friction between material and screw ,between material and chamber will be created ,which also creates friction and relative movement among material particles. On the other hand, root diameter of the pressing screw caries larger from one end to the other ,hence. When rotating ,it not only pushes particles moving forwards but turns them outwards as well ,meanwhile ,particles adjacent the screw will rotation along with screw’ rotating ,causing every particle inside the chamber to possess different speed. Therefore relative movement among particle creates heat which is necessary during manufacturing because of helping protein change property ,damage colloid ,increase plasticity ,decrease oil’s elasticity ,resulting in high oil productivity.
2. Structure: The machine is composed of five parts: hopper part, gear box part, press chamber part, screw press part and frame part: see figure 1

pic(1)
3.Installment
The oil press must be installed by bolts firmly on the foundation and be kept horizontal
NO | lubrication | lubricate | Time span | Lubricate replacement period |
1 | Adjusting bolt | Mechanical oil NO.20 | 1-2time/day |
|
2 | Bevel gear | Mechanical oil NO.20 | 1-2time/day |
|
3 | Bearing bush | Mechanical oil NO.20 | 1-2time/day |
|
4 | Gearbox | Mechanical oil NO.20 | Refuel 12kg for the first time | Each six months |
5 | bearing | grease |
| Each every year |
4.1 Oil press is lubricated by lubricating oil and grease, see table(2)4.Lubrication
5.1 Preparation before operating
5.1.1 12kg of lubricant needs to be filled into the gearbox.
5.1.2 After installing the machine, check whether lubricant has been filled in, bolts have been tightened, and handles are operable.
5.1.3 Check large pulley whether it is loose or blocked ,repair it if necessary.
5.1.4 Adjust the tightness of the belt ,switch on the motor and check its rotation direction.
5.1.5 Loosen the lock nut and tighten the screw to its end, then loose it for3-4circles and then tighten it again for half circle to assure the gap of the residue cake outlet.
5.2 Operation
5.2.1 Feeding must be steady and slow at the beginning to avoid blocking
5.2.2 In the case no cake is extrude outward,return back the screw for 1-2circle 。If there is still no cake is observed,machine needs to be shut down and checked ,However, in any case, operating the machine backward is absolutely prohibited normally ,cake looks like tile but not sticky ;thickness is 1-2mm ,inner side is smooth ,out side creases and no oil the surface is allowed.
Cake thickness adjustment: Rotating the adjusting handle clockwise will make the cake thicker, otherwise will make it thinner. Each circle of adjustment (by adjustment bolt left hand T 165x6) will change the thickness 0.4-0.5mm.
5.2.3 When machine is operating, oil extruding and residue outlet need be checked frequently .Normally, most of oil will flow outward from square rods and several front round plates. Broken cake residue indicates the material is too dry ; steam emerging from the cake residue indicates that it is too wet ,In any case ,water content in the raw material must be adjusted from time to time.
Slag slice emerging indicates too much water content and power-like slag low water content .Loose round plates will cause too much slag flowing outwards. However, adequate water content will cause slag flowing outwards from square rods; little slag from round plates is allowed. In a word, water content affects oil output rate, it needs adjusting properly.
5.3 Stopping
5.3.1Repeatedly move screw forwards and backwards for several times and let all material resided in the chamber goes out and adjust the cake to the possible thinnest, then stop the machine.
5.3.2 When machine stops caused by any accident, power supply must be shut down first, then rotate large pulley manually backwards, let the material return out . Then pull out the shaft and clean it. In the case the shaft could not be pulled out, remove the upper case and loose lock nut, separate round plates and clean them one by one.
6. Maintenancen and Assembly/disassembly of Main parts
6.1 Assembly/disassembly of Main parts
6.1.1 Pressing case (round plates, square rods holder)
Rotate the screw shaft and remove it from the chamber. Loose the lock nut on the outlet end by rotating it counter-clock wise using a 24 mm diameter bar, loose four M14bolts, remove ten M16 bolts which are used to connect upper and lower cases. However ,after removing upper case, round plates and square rods holder can be pulled out.

Pic(2)
Item |
Description | Q’ty per set | Item | Description | Qty per set |
1
| Pressing bar |
30 | 8 | Pressing ring NO.20、21 | 2 |
2 | Rails group ring | 1 | 9 | Cake output ring | 1 |
3 | Pressing ring NO.1 | 1 |
10 | Pressing bolt | 1 |
4 | Pressing ring NO.6、16、22 | 3 |
11 | Pressing cage major key | 1 |
5 | Pressing ring NO.7 | 2 | 12 | Bottom cage | 1 |
6 | Pressing ring NO8、18 | 2 |
13 | Pressing cage minor key | 1 |
7 | Top cage | 1 | 14 | Pressing ring NO.2-5、9-15 | 10 |
6.1.2 Remove square rods:
After removing the holder, tap the end of one rod and take it out, then others will be easily removed.
6.1.3 Assembly of rods:
Erect the rod holder vertically and make its side with oil grooves locate downwards, better on a wooden plate, then put square rods to touch holders inner wall circumferentially with their grooves downwards again. However, grooves of every two adjacent rods should not be touched. Then insert shins(by a hammer)properly into rods gap to let than firmly touch rods holders inner wall. As a matter of fact, whole inner wall of rods should be smooth.
6.1.4 Assembly of the case:
Put the groove side of rod the holder to face the machine body, then insert round plates as per marks on them. Put lock nuts on to contact plates and then mount the upper case. Tighten bolts one by one.
6.2 Pressing screw:
6.1.1 Disassembly of the screw :rotate the handle as soon as machine stops and pull out the screw from the chamber ,remove nuts and adjusting bolt. Insert a 16mm diameter bar into lock nut and turn and turn it clockwise.(important note: left hand screw).After taking off lock nut, each part of pressing screw can be removed. However, holes in the screw might be blocked by fine slag particles, which retard the disassembly. Tapping or heating pressing screw might help disassembling.
6.1.2 Mounting pressing screw: put small end of its shaft upwards, mount the first screw and then the second...sequence, tighten then by the lock nut to avoid particles in . On both ends of adjusting bolt, which is easily swung on the shaft by adjusting nut, two bearing 8309 are mounted. Be careful to make big hole sides of these two bearings touch adjusting bolts double ends. Finally , whole pressing screw will be tightened by two M42×2 nuts, But certainly, gaps of two bearings need to be carefully set. In fact, if hands can swing adjusting bolts smoothly, the adjustment is acceptable.
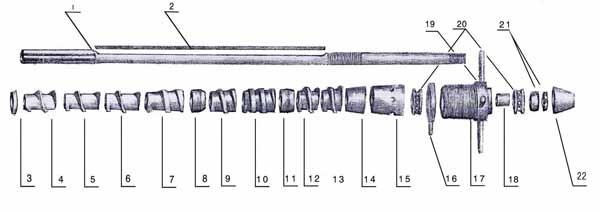
Pic(3)
Item | Description | Qty per set | Item | Description | Qty per set |
1 | Screw shaft | 1 |
12 | Worm NO.9 | 1 |
2 | Long flat key | 1 | 13 | Worm NO.10 | 1 |
3 | Intermediate ring | 1 |
14 | Cake guide ring | 1 |
4 | Worm NO1. | 1 |
15 | Press nut | 1 |
5 | Worm NO.2 | 1 |
16 | Tight nut | 1 |
6 | Worm NO.3 | 1 |
17 | Adjusting bolt | 2 |
7 | Worm NO.4 | 1 |
18 | Adjusting bolt bush | 4 |
8 | Worm NO.5 | 1 |
19 | Big handle | 2 |
9 | Worm NO.6 | 1 |
20 | Bearing 8309 | 2 |
10 | Worm NO.7 | 1 |
21 | End nut | 1 |
11 | Worm NO.8 | 1 |
22 | Safe cover |
|
6.3 structure diagram of gearbox

Pic(4)
Item | Description | Qty per set | Item | Description | Qty per set |
1 | Big belt wheel | 1 | 11 | Gearbox cover | 1 |
2 | Gland | 3 | 12 | Gear 52 teeth | 1 |
3 | Bearing309 | 4 | 13 | Hollow shaft | 1 |
4 | Spacing collar | 2 | 14 | Gearbox body | 1 |
5 | Gear 38 teeth | 1 | 15 | Gearing major axis | 1 |
6 | Gear 15 teeth | 1 | 16 | Gear 15 teeth | 1 |
7 | Big gland | 1 | 17 | Oil seal | 1 |
8 | Bearing 217 | 2 | 18 | Gland with hole | 1 |
9 | Gearbox minor axis | 1 | 19 | Small triangle | 1 |
10 | Connecting bush | 1 |
|
|
|
Following items are strictly requested to be obeyed.7. Safety
7.1 During operating, hands or metal rods are strictly prohibited to enter the hopper to touch cakes.
7.2 Tightening the screw shaft to its dead end is prohibited before starting or during operating, which might cause slag outlet to contact cake outlet ring, resulting in wearing.
In the case of storage, oil dirt on machines surface and slags on each part need to be taken off. Paint
rust-resisting grease and keep in dry place. Case needs to be covered to prevent dirty foreign particles from entering.
8. Factors affecting oil output rate
Following factors may affect oil output rate:
8.1 Water content:This is the critical factor,as a matter of fact ,water content directly affects oil output rate
However, user usually has not proper inspection equipment. Hence, water content of some main raw material may be detected as follows:
8.1.1 Bean: if teeth beating could crack it, forming flat pieces accompanied with light sound , the water content is suitable. Flat piece without cracking means too wet. Heating or sunshine may be drive water off. However, cracking accompanied with loud indicates too dry. Adequate water needs to be added.
8.1.2 Cotton seeds: shell and kernel may be separated by teeth beating. Shell breaking may be accompanied by sound, which means water content is suitable .shell being flatting indicates too wet, shell being splitted into powder means too dry.
8.1.3 Rape seeds: They can be pressed either at hot or at cold state.
Cold pressing: extruding by finger, if they splitted into two pieces, accompanied by sound and oil, this implicates water content is adequate. Otherwise, extruding makes power indicates too dry; makes flat slice, too wet.
Hot pressing (after heating) : To scratch seeds by two slices of wood, if shell and kernel could be splitted, water content is adequate. If kernel becomes power, it is too dry; in the case that shell and can be splitted, it is too wet.
8.2 Cakes thickness reflects the pressure inside the chamber. Thicker cake indicates lower pressure inside the chamber; thinner cake-higher pressure inside. If raw material has less oil content, chamber pressure should be higher, cake will be thinner, round plates need to be tightened; in the case of high oil content material, pressure in the chamber should be lower, then circular plates need to be loosened, resulting in thicker cake. Recommended thickness of cakes will be.
Bean: 1.1-1.5mm for the first pressing ;0.5-1mm for the second pressing.
Cotton seeds : only one pressing , 1-2mm.
Ground nut kernel : Normally cold pressing for 2-3 times , 1-2mm
Important note: cakes thickness should be as according to different factors to achieve highest oil output rate. Hence, above figures will only be for reference.
9. failures and removal
NO | Failures | Reasons | Removal |
1 |
Sudden stop, shaft blocked | 1. New machine without running up. 2. Cake too thick, pressure too high. | 1.Carefully operating as per the manual. 2.Note motor sound and current value |
2 |
Low oil output | 1. Non-adequate water content. 2. Low chamber temperature. 3. Non-adequate gap among rods or plates. 4. Parts worn. | 1.Operating as per the manual. 2.Loosen tightening nut to drive slag off. 3.Replace worn parts. |
3 |
Oil return to hopper | 1. Too tight rods and plates. 2. high oil content and thicker cake. | 1.Loosen tightening nut。 2.Adjust cake thickness and add cakes into chamber to drive oil off |
4 |
Oil spot on cakes | 1. Too much water content . 2. Too small gap among rods and plates. 3. Parts worn | 1.Operating as per the manual 2.Loose tightening nut. 3.Replace worn parts |
5 |
Dark and viscous oil | 1. Low chamber temperature. 2. Too much forming particles in oil . 3. Raw material too dry. | 1.Operating as per manual 2.Selecting raw material |
6 |
Low productivity | 1. Poor quality of cotton seeds. 2. Chamber and pressing screw not smooth. 3. Raw material too much water content . 4. Too much gap at oil outlet port. 5. Worn screw | 1.Cotton seeds selected. 2.Make chamber and screw and smooth. 3.operating as per manual 4.replace worn parts |
7 | Raw material can be fed | 1. Oil returns to hopper. 2. Wet raw material . | 1.operating as per manual 2.cotton seeds prepared |
8 | Cracked residue appears at the outlet severely | 1. Gaps among rods and plates too big 2. Too high pressure in the chamber. 3. Parts worn. 4. Raw material too dry. | 1.operating as per manual 2.replace worn parts |
10.Extruding methods of several raw material.
10.1 Bean : two ways , cold and hot extruding.
(1) Cold extruding :bean-selecting-pressing (in case of adequate water content).
(2) Hot extruding : bean-selecting-per-pressing-heating(steaming etc)-pressing.
Firstly, selecting beans and remove foreign particles, then soften by breaking and adding water of 7-8%,and then steam them to 115C; beans will be ready for extruded.
10.2 Rape seeds: also, cold and hot extruding for your choice, but normally hot extruding is recommended.
Cold extruding : selecting –pre-pressing.
Hot extruding: selecting –pre –pressing-heating(steaming etc)-pressing.
When hot extrusion, to remove foreign particles by selection ,then check water content as described above; in case of too dry, add 2.5-3% of water. Normally two times extruding is enough.
When cold extrusion, after selecting , to pre-press and heat them, During heating, add2-3%of water and await till look coffee color and temperature 110-120C, then ready for pressing.
10.3 Groundnuts kernel, cold and hot extrusion are both available ,yet prefer hot pressing. When hot pressing ,firstly crack or pre-press, then steam for 1.5-2 hours, temperature about 120C.water content 3%will be good. Normal pressing starts at temperature of 85C. or crack them firstly and at a pot, add 7-8% of water, look coffee color will be ready for pressing.
10.4 Groundnuts: remove shell first and remove red peel of the kernel ,then press for two times, Sound indicates it is too wet and need drying. In the case of poor cake moving out, mix about 20%of with them may help.